Stepping onto the grounds of an old Spanish mission, especially in California or the Southwest, a casual observer might simply appreciate the aesthetic beauty: the graceful arches, the terracotta roofs, the quiet courtyards. Yet, to truly understand these venerable structures, one must peel back the layers of romanticized history and look at the sheer pragmatic brilliance embedded in their very construction. Having traversed these historic landscapes for decades, I’ve found that the most profound insights lie not in sweeping panoramas, but in the granular details of how these buildings actually worked, how they were conceived, and what they tell us about the people who built them.
My journeys have consistently revealed that what appears simple on the surface often hides complex, climate-adaptive solutions. We’re not talking about academic blueprints meticulously followed; these were structures built with available materials and often by people learning on the job, guided by age-old traditions and a fierce determination. It's an architecture that speaks of both grand vision and humble practicality. Forget the glossy brochures for a moment; let's dig into the bones of these magnificent relics.
More Than Just a Pretty Plaza: Unpacking the Mission Courtyard's Practicality
What strikes many first-time visitors to a Spanish mission is the serene internal courtyard. Typically known as a patio or quadrangle, these spaces were far from decorative afterthoughts; they were the very heart and circulatory system of mission life. Many guides will tell you they offered a place for quiet contemplation, which is true, but they served far more vital, prosaic functions. Imagine these missions centuries ago: isolated outposts in often-hostile territories. The fully enclosed courtyard, with its single, guarded opening to the outside world, was a fortress, a protected sanctuary against raids and a secure space for daily activities.
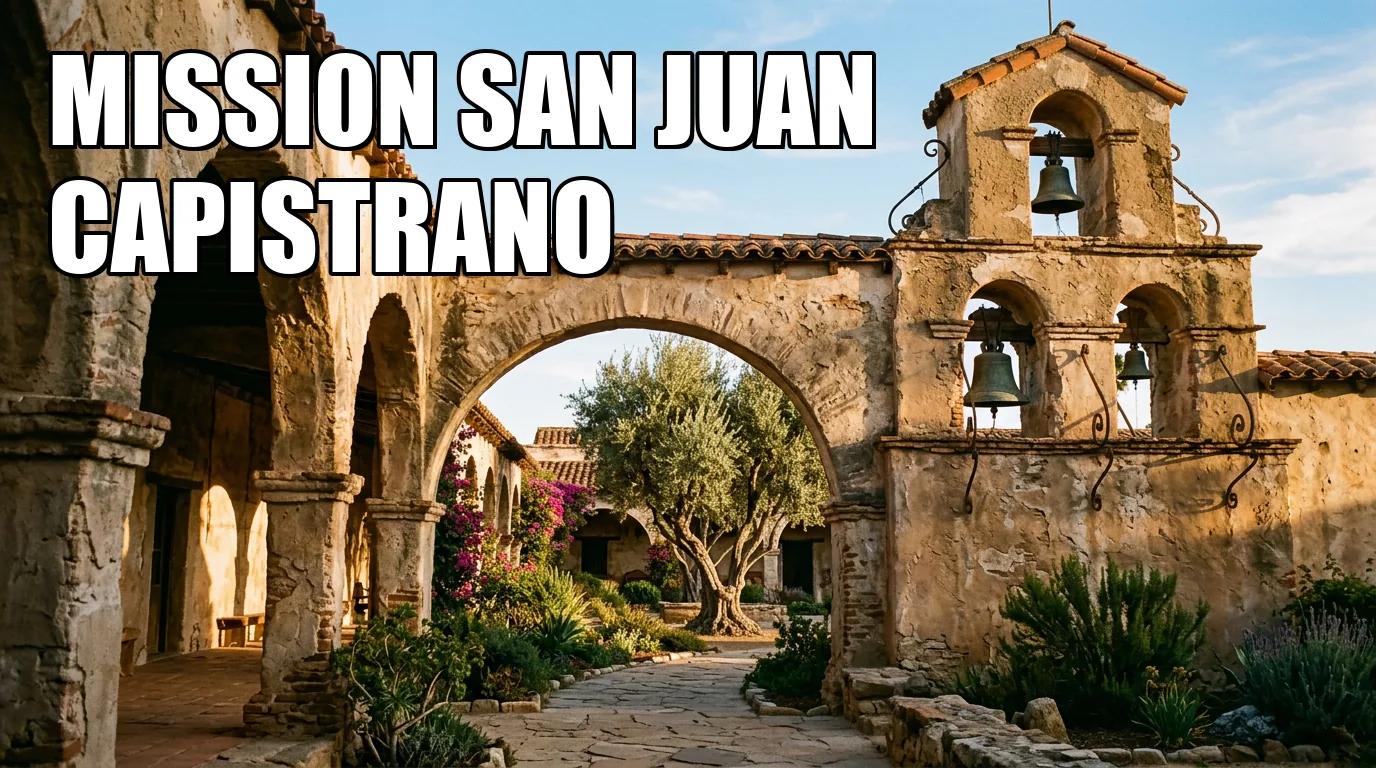
Consider the sheer variance in their dimensions. Mission Santa Ines, for instance, boasts a sprawling rectangular quadrangle measuring roughly 145 feet by 368 feet—a substantial footprint. Then you have Mission San Juan Capistrano, whose courtyard is described as approximately 100 yards square, a roughly 300-foot-by-300-foot expanse. Mission San Miguel Arcangel, in contrast, presents a quadrangle 200 feet from east to west and 238 feet from north to south. Why such differing sizes? It wasn't arbitrary. These dimensions were dictated by the specific needs of each mission community, the available land, and the resources to construct the surrounding buildings. Each courtyard was an outdoor extension of the mission's workshops, kitchens, and living quarters, a bustling hub where trades were practiced, goods were produced, and daily life unfolded under the watchful eye of the mission fathers.
Moreover, the ubiquitous covered walkway, or corredor, which encircles the interior perimeter, wasn't just for aesthetic appeal or a pleasant stroll. These arcaded passageways, formed by the overhanging roofs, served a critical protective role, shielding the vulnerable adobe walls from rain erosion and providing essential shade during the scorching summer months. Standing beneath one of these corredores on a hot afternoon, feeling the palpable drop in temperature, you truly appreciate the indigenous wisdom combined with Spanish building techniques. It’s an elegant solution to a harsh climate, a testament to passive cooling and durable construction that modern architects often rediscover with much fanfare.
Fired Clay, Enduring Legacy: The Genesis of Mission Roof Tiles
One of the most defining and visually captivating elements of Spanish Colonial architecture in the US is the distinctive terracotta roof tile. You see them everywhere from San Diego to St. Augustine, but few pause to consider their origins or the sheer labor involved in their creation. These weren't just tiles; they were a revolutionary construction practice, particularly in California. It was Mission San Antonio de Padua, established in 1771, that holds the distinction of being the first California mission to employ fired-tile roofing, setting a precedent that would spread like wildfire across the region and continues to influence design today.
These early mission barrel tiles were typically around 22 inches long and tapered in width, a shape achieved by molding wet clay over sections of logs. Imagine the effort: harvesting the clay, shaping it by hand, then firing it in kilns—all labor-intensive processes. This semicircular, curved form wasn't just for looks; it was incredibly effective at shedding rainwater, crucial for protecting the adobe walls below. When you compare these substantial pieces to earlier roof tiles from 18th-century Moravian settlements in Pennsylvania, which measured a more modest 14-15 inches long and 6-7 inches wide with specific drainage grooves, you appreciate the scale and specialized form of the mission tiles. Modern tiles, for reference, hover around 20 inches in length and 8.5 inches in width, showing how little the fundamental dimensions have changed for optimal performance.
The Unseen Engineering: How Mission Roofs Braved Centuries of Weather
How did these roofs, fashioned from seemingly simple materials, manage to endure for centuries, often with minimal intervention? The answer lies in systematic, thoughtful installation techniques that were both robust and adaptable. Tiles weren't just tossed onto a roof; they were laid in straight, parallel lines, meticulously lapped according to specific patterns. Each tile was fastened with one, two, or sometimes three nails, the number determined by the roof’s pitch and its exposure to wind. On steeper slopes or in areas prone to high winds, these tiles were often set in plastic cement or sealant, or even secured with copper "hurricane clips," a remarkably forward-thinking precaution for the time.
Underneath these layers of terracotta, a robust structural system provided the backbone. The tiles were affixed to wooden battens or laths—strips installed perpendicular to the main roof beams, creating a sturdy framework. Before any tile touched the surface, the roof deck itself had to be clean, smooth, and dry, a basic principle of good construction that remains true today. The tiles overlapped in courses, with an exposure, the visible part of the tile, typically ranging from 9.5 to 11.25 inches. This overlapping wasn't just about covering; it was a carefully calibrated system for water diversion, ensuring that rain was channelled efficiently off the roof, away from the vulnerable walls below.
Digging deeper, the primary structural members of these roofs were hefty wooden beams known as vigas. These were often spaced about 3 feet apart, though it's worth noting that irregular or unequal spacing was characteristic of Spanish Colonial construction. This wasn't sloppiness; it was often a reflection of timber availability or the inherent flexibility of the building tradition, lending a rustic authenticity you rarely find in today's precision-engineered structures. Perpendicular to the vigas, smaller secondary members called latillas or branches were laid, creating the final supportive grid upon which the tile rested. This combination of heavy timber, adobe, and clay tile wasn't just functional; it was astonishingly durable, allowing many mission buildings to remain substantially intact for more than two centuries. It's a testament to a construction philosophy rooted in material honesty and practical strength.
Arches of Intent: Decoding the Design Language of Early California Missions
The arcades of the Spanish missions are perhaps their most recognizable feature, but to truly appreciate them, we need to look beyond their picturesque curves. These arched openings, prevalent in early California missions from the 18th and early 19th centuries, were more than just architectural flourishes; they were sophisticated feats of engineering and expressions of cultural tradition. You’ll encounter a fascinating variety: semicircular, elliptical, and segmental arch forms, each chosen for specific reasons.
Consider the arcade extending 225 feet along the convento's east side at Mission San Miguel Arcangel. This isn't a monotonous repetition of arches. Instead, it features twelve arched and square openings supported by square pillars of burnt bricks, displaying a subtle yet intentional hierarchical arrangement. Notice how the two center arches are elliptical and conspicuously larger than the others, flanked by four smaller semicircular arches, and then a still-smaller arch on either side. This isn't random; it's a deliberate design choice, perhaps signaling importance, guiding the eye, or simply showcasing the builders' mastery of various arch forms. Mission San Antonio de Padua, too, showcases three distinct arched openings crafted from burned brick, creating a unique visual rhythm along its arcade.
The construction of these arches, often from adobe and fired brick masonry, was a delicate process. Builders used tapered brick units, carefully laid with uniform mortar joints to create a structure that functions entirely through compression. Think of it: no steel reinforcement, just the inherent strength of the curve and the interlocking bricks bearing the load. While precise historical measurements for every arch are scarce, architectural proportioning rules of the time provide insight. For segmental and semicircular arches in masonry, the arch depth typically needed to equal or exceed 1 inch for every foot of arch span, with a minimum depth of 4 inches for any opening smaller than 4 feet. So, for an 8-foot span, you’d expect a minimum arch depth of 8 inches. The adobe bricks themselves, which formed the bulk of the structures, measured around 10 by 14 by 5 inches, while fired bricks, used for the more critical load-bearing elements like arches, ranged from 10 to 18 inches long and 7 to 10 inches wide.
These arches weren't built in thin air; they relied on temporary wooden centering frames that supported the structure until the mortar cured. Once the mortar set, these arches became self-supporting load-bearing elements, distributing weight outward and downward to the supporting pillars or walls through their clever curved geometry. It's a marvel of historical engineering, often taken for granted, but crucial to the longevity and strength of these revered buildings.
Planning Your Expedition: Practicalities for the Discerning Architectural Explorer
So, how does one best experience these architectural marvels, moving beyond the casual tourist glance to a deeper appreciation? Timing is paramount. To avoid the oppressive summer heat and the throngs of family vacationers, I strongly recommend aiming for late fall (October-November) or early spring (March-April). Not only is the weather more forgiving, but the sites are often less crowded, allowing for moments of quiet observation and reflection that are essential for truly absorbing the atmosphere.
Before you go, always check the individual mission's website for specific admission fees and parking costs. Many missions are active churches or museums with varying operating hours and special events. If you're hoping for that serene, unblemished photograph of an empty courtyard or an archway, plan to arrive shortly after opening on a weekday. Weekends often bring school groups and larger crowds, which, while vibrant, can detract from the introspective experience. Pay particular attention to the details: run your hand along the cool adobe, examine the imperfections in a hand-formed roof tile, or trace the subtle taper of an arch. These are the tactile connections to history that typical guides rarely emphasize.
Don't be swayed by claims of "tourist traps." While some missions are undeniably more commercialized than others, particularly those easily accessible from major cities, their core architectural integrity and historical significance remain. The "authenticity" isn't diminished by a gift shop; it's about the structure itself. Challenge yourself to seek out the quiet corners, the less-trafficked arcades, and the small interpretive exhibits that delve into the construction details. Look for the traces of early paint on plaster, the wear on stone steps, the subtle repairs over centuries. These details tell a story far richer than any brochure. Remember, the goal isn't just to see these sites, but to understand them, to connect with the human ingenuity that brought them into being and kept them standing for so long.